SPECIAL OFFERS

LOCATIONS

APPOINTMENTS
PATIENT FORMS
Select a Category:
Orthodontic FAQ

 What age should my child have an orthodontic evaluation?
The American Association of Orthodontists (AAO) recommends an orthodontic screening for children by the age of 7 years. At age 7 the teeth and jaws are developed enough so that the dentist or orthodontist can see if there will be any serious bite problems in the future. Most of the time treatment is not necessary at age 7, but it gives the parents and dentist time to watch the development of the patient and decide on the best mode of treatment. When you have time on your side, you can plan ahead and prevent the formation of serious problems.
Why is it important to have orthodontic treatment at a young age?
Research has shown that serious orthodontic problems can be more easily corrected when the patient’s skeleton is still growing and flexible. We can prepare the mouth for the eventual eruption of the permanent teeth by correcting the skeletal problems at a younger age. If the permanent teeth have adequate space to erupt they will come in fairly straight. If the teeth erupt fairly straight, their tendency to get crooked again after the braces come off is diminished significantly. After the permanent teeth have erupted – usually from age 12-14 – complete braces are placed for final alignment and detailing of the bite. Thus, the final stage of treatment is quicker and easier on the patient. The last phase of treatment usually lasts from 12 – 18 months and is not started until all of the permanent teeth are erupted.
Doing orthodontic treatments in two steps provides excellent results, often allowing the doctor to avoid removal of permanent teeth and jaw surgery.
- Phase-1 treatment is conducted when some of the baby teeth are still present is called.
- Phase-2 treatment occurs after all of the permanent teeth have erupted.
What causes crooked teeth?
Crowded teeth, thumb sucking, tongue thrusting, premature loss of baby teeth, and a poor breathing airway can all contribute to poor tooth positioning. Hereditary factors such as extra teeth, large teeth, missing teeth, wide spacing and small jaws – all can be causes of crowded teeth.
How do teeth move?
Tooth movement is a natural response to light pressure over a period of time. Pressure is applied by using a variety of orthodontic appliances. The most common orthodontic hardware are braces or brackets attached to the teeth and connected by an arch wire. Periodically changing these arch wires puts pressure on the teeth. At different stages of treatment your child may wear headgear, elastics, a positioner or a retainer. Most orthodontic appointments are scheduled 4 to 6 weeks apart to give the teeth time to move.
Will it hurt?
Discomfort may result when teeth are first moved. This usually lasts about 24 to 72 hours. Patients report a lessening of pain as the treatment progresses. Pain medicines such as acetaminophen (Tylenol) or ibuprofen (Advil) usually help relieve the pain.
Orthodontic Care
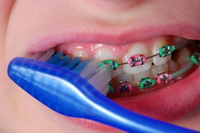
Braces Care
You will be shown the proper care of your braces when your orthodontic treatment begins. It’s important to clean your mouth every time you eat. Teeth with braces are harder to clean, and trap food very easily. If food is left lodged in the brackets and wires, it can cause unsightly etching of the enamel on your teeth. Your most important job is to keep your mouth clean. If food is allowed to collect, the symptoms of gum disease will begin to appear. The gums will swell and bleed and the pressure from the disease will slow down tooth movement.
 BRUSHING: You should brush your teeth 2-3 times per day.
- Brush back and forth across……between the wires and gums on the upper and lower to loosen any food particles.
- Next, brush correctly as if you had no brackets or appliances on.
- Start on the outside of the uppers with the bristles at a 45 degree angle toward the gum and scrub with a circular motion two or three teeth at a time using ten strokes, then move on.
- Next, do the same on the inner surface of the upper teeth.
- Then, go to the lower teeth and repeat steps 2, 3 and 4.
Look in a mirror to see if you have missed any places. Your teeth, brackets and wires should be free of any food particles and plaque.
Note: If your gums bleed when brushing, do not avoid brushing, but rather continue stimulating the area with the bristles. Be sure to angle your toothbrush so that the area under your gum line is cleaned. After 3 or 4 days of proper brushing, the bleeding should stop and your gums should be healthy again.
FLOSSING: Use a special floss threader to floss with your braces on. Be sure to floss at least once per day.
Fluoride rinse or gel may be recommended for preventive measures.
Appliance Care
Clean the retainer by brushing with toothpaste. If you are wearing a lower fixed retainer be extra careful to brush the wire and the inside of the lower teeth. Always bring your retainer to each appointment. Avoid flipping the retainer with your tongue because it can damage your teeth. Place the retainer in the plastic case when removing it from your mouth. Never wrap the retainer in a paper napkin or tissue because someone may throw it away. Don’t put it in your pocket or you may break or lose it. Excessive heat will warp and ruin the retainer, so don’t leave it in your car during the hot summer months.
Elastics Care
If elastics – called rubber bands – are worn intermittently, they will continually cause more soreness. Sore teeth between appointments usually indicates improper wear of headgear or elastics, or signals inadequate hygiene. Wear your elastics exactly as your orthodontist instructs you. Take your elastics off while brushing. Change elastics as directed, usually once or twice a day.
Avoid Sticky Foods such as:
Caramel
Candy bars with caramel
Fruit Roll-Ups
Gum
Candy or caramel apples
Skittles
Starbursts
Toffee
Gummy Bears
Avoid Hard or Tough Foods Such as:
Pizza Crust
Nuts
Hard Candy
Corn Chips
Ice Cubes
Bagels
Popcorn Kernels
Cut the following foods into small pieces and chew with your back teeth:
Apples
Carrots
Corn on the Cob
Pizza
Pears
Celery
Chicken Wings
Spare Ribs
Orthodontic Terms
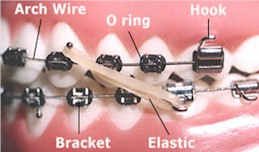
Arch Wire
The part of your braces which actually moves the teeth. The arch wire is attached to the brackets by small elastic donuts or ligature wires. Arch Wires are changed throughout treatment, and each change brings you closer to ideal tooth positioning.
Brackets
Brackets are the small attachments that are bonded directly to the tooth surface. The brackets are the part of your braces to which the dentist or assistant attaches the arch wire.
Occasionally, a bracket may come loose and become an irritation to your mouth. You can remove the loose bracket and save it in an envelope to bring to the office. If a bracket becomes loose, call the office as soon as possible and make an appointment to re-glue the bracket.
Elastics (Rubber Bands)
At some time during treatment, it will be necessary to wear elastics to coordinate the upper and lower teeth and perfect the bite. Once teeth begin to move in response to elastics, they move rapidly and comfortably. If elastics (rubber bands) are worn intermittently, they will continually cause more soreness. When elastics are worn one day and left off the next, treatment slows to a standstill or stops altogether. Sore teeth between appointments usually indicate improper wear of headgear or elastics, or inadequate oral hygiene. Wear your elastics as instructed by your orthodontist. Take your elastics off while brushing. Change elastics as directed, usually once or twice a day.
Headgear
Often called a night brace, headgear is used to correct a protrusion of the upper or lower jaw. It works by inhibiting the upper jaw from growing forward; or the downward growth of the upper jaw, or even by encouraging teeth to move forward.
Malocclusion
Poor positioning of the teeth.
Types of Malocclusion
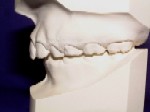
Class I
A Malocclusion where the bite is OK (the top teeth line up with the bottom teeth) but the teeth are crooked, crowded or turned.
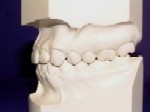
Class II
A Malocclusion where the upper teeth stick out past the lower teeth. This is called an overbite.
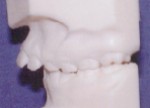
Class III
A Malocclusion where the lower teeth stick out past the upper teeth. This is also called an underbite.
Occlusion
The alignment and spacing of your upper jaw and lower teeth when you bite down.
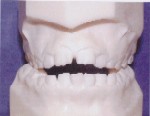
Openbite
Anterior opening between upper and lower teeth.
Overbite
Vertical overlapping of the upper teeth over the lower teeth.
Overjet
Horizontal projection of the upper teeth beyond the lower teeth.
Crossbite
When top teeth bite inside the lower teeth.
It can occur with the front teeth or back teeth.
O Rings
O rings, also called A-lastics, are little rings used to attach the arch wire to the brackets. These rings come in a wide variety of colors to make braces more fun. A-lastics are changed at every appointment to maintain good attachment of the arch wire to the bracket, enabling patients to enjoy many different color schemes throughout treatment.
Separator
A plastic or rubber donut piece which the dentist uses to create space between your teeth for bands.
Fixed and Removable Appliances
Band & Loop (B & L)
A Band & Loop is routinely used to hold space for a missing baby back tooth until the permanent tooth can grown in.
Herbs
An appliance designed to encourage the lower jaw to grow forward and catch up to upper jaw growth.
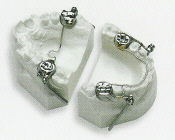
Lower Lingual Arch (LLA)
A lower lingual arch is a space maintainer for the lower teeth. It maintains molar positioning and does not move them. It’s by placing bands on the molars and connecting them to a wire that fits up against the inside of the lower teeth. It keeps the molars from migrating forward and prevents them from blocking off the space of teeth that develop later. This is used when baby teeth are lost early, or when lower teeth are slightly crowded in a growing child and you want to avoid removing any permanent teeth to correct the crowding.
Palatal Expander
An appliance which is placed in the roof of the mouth to widen the upper dental arch. The maxilla – or upper dental arch – is joined in the center by a joint, which allows it to be painlessly separated and spread. A temporary space may develop between the upper two front teeth. This will slowly go away in a few days. Once this has occurred, the two halves knit back together and new bone fills in the space.
Quad Helix
This appliance provides continual, gradual pressure in as many as four directions, to move molars, expand or contract arches, or assist in eliminating finger or thumb sucking habits.
Bi Helix
An appliance used to expand the lower arch without interfering with tongue posture or movement.
Hawley
A universally used retainer with many applications; to move teeth, close spaces, maintain alignment during or after treatment.
Nance
The Nance maintains the position of the maxillary molars without using any other teeth. The plastic button on the palate provides stability.
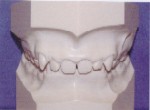
Retainers
Upon completion of the active phase of orthodontic treatment, braces are removed and removable appliances called retainers are placed. Teeth must be retained – or held – in their new positions while the tissues and bone, elastic membranes around the roots, the gums, tongue and lips have adapted themselves to the new tooth positions. Teeth can move if they are not retained. It is extremely important to wear your retainer as directed.
Orthodontic Emergencies or Problems
Please feel free to contact our office if you are experiencing any discomfort or if you have any questions about your orthodontic appliance. Below are a few simple steps that might help if you are unable to contact us or if you need a quick fix.
Loose Bracket
Occasionally, a glued bracket may come loose. You can remove the loose bracket and save it in an envelope to bring to the office. If a bracket becomes loose, call the office as soon as possible in order for us to allow time to re-glue the bracket.
Poking Wire
If a wire is poking your gums or cheek there are several things you can try until before scheduling an office appointment. First, try a ball of wax on the irritating wire. You may also try using a nail clipper or cuticle cutter to cut the extra piece of wire that is sticking out. Sometimes, a poking wire can be safely turned down so that it no longer causes discomfort. You can use a pencil eraser, or some other smooth object to tuck the offending wire out of the way.
Wire Out of Back Brace
Please be careful to avoid hard or sticky foods that may bend the wire or cause it to come out of its proper brace. If this happens, you may use needle nose pliers or tweezers to put the wire back into the hole in the back brace. If you are unable to do this, you may clip the wire to ease the discomfort. Please call the office as soon as possible to schedule an appointment to replace the wire.
Poking Elastic (Rubber Band) Hook
Some brackets have small hooks on them for elastic wear. These hooks can occasionally become irritating to the lips or cheeks. If this happens, you may either use a pencil eraser to carefully push the hook in, or you can place a ball of wax on the hook to make the area feel smooth.
Sore Teeth
You may be experiencing some discomfort after beginning treatment or at the change of wires or adjusting of appliances. This is normal and should diminish within 24-72 hours. A few suggestions to help with the discomfort:
- Rinse with warm water.
- Eat a soft-food diet.
- Take acetaminophen (Tylenol) or ibuprofen (Advil) as directed on the bottle.
- If pain persists more than a few days, call our office.